Sunday 29 January 2017

TWRP Custom Recovery for Galaxy S6/S6 edge Install without PC

Leave a Comment

DISCLAIMER

  • Both rooting and installing a custom recovery on your device will trip the KNOX counter, means that your warranty will be void and Samsung Pay may not work on your device. This method is for advance users only If something wrong happens with your device then droidopinions.com will not be held responsible.

INSTALLING THE RECOVERY(TWRP), TUTORIAL;

Before starting you should backup your important data. For installing the recovery you need a rooted phone. Click on the below links to know how to root your galaxy s6 or galaxy s6 edge.

STEP-1

  • First of all download the Recovery TWRP from the links below.
  1. Download TWRP for galaxy S6 edge all models.
  2. Download TWRP for galaxy S6 all models.
  3. Download TWRP for Galaxy S6 Sprint Model.

STEP-2

  • Now open the google play store on your device and install Flashify.

STEP-3

  • Now open the app on your phone. It will give you a disclaimer.Press “Accept” and then Flashify will ask for superuser access so, tap on “Grant” option.

STEP-4

  • After that, in the application press the “Recovery Image” option and  press “choose a file”. Now from here choose the file that you have downloaded in the previous step.

STEP-5

  • Now Flashify will ask if you are ready to install the file. Press the “Yes” option and wait for about 30 seconds to complete the process.

STEP-6

  • Once the flashing process is complete, tap on the “Reboot Now” option and your phone will directly boot into your newly installed TWRP recovery.
install-custom-recovery-your-galaxy-s6-s6-edge
That’s it guys. Now you will have the custom TWRP recovery on your phone. You can flash custom roms, install zip files and can take take a full backup of your android device.

Check the TWRP Custom Recovery on your Galaxy S6/S6 edge

If you want to check the custom recovery on your phone then you can do this by going in to recovery mode. You can enter into recovery mode by doing the following.
  • Press and Hold Home+VolumeUp+Power button for some seconds.
  • Release the buttons when you see the blue text on the screen i.e Recovery Booting.
Now your phone is in recovery mode, you can check out the new custom recovery here.Now tap on the Reboot option if you would like to get out of the recovery mode.

Don't forget to like our official fb page


Read More

Platinum EDGE ROM V6.0 - [DEODEXED] For SAMSUNG S6 EDGE By Hax4us

1 comment

  • DisclaimerI'm not responsible for any device. Flash on your own risk! Warranty is void if flashed.


I want to present you the Platinum Edge ROM , i decided to share with you, i hope can enjoy it.
Please let me know if you have issues with my rom.


Description:
- Based on XXS5DQA firmware with the JANUARY security patch.
- ROOT, Deodexed, Zipaligned, Busybox, Deknoxed and SQlite.
- Smooth and great battery life.
- S7 Wallpapers
- Note 7 Sounds
- Some deleted apps that can you download on play store or galaxy apps store.


How to install :
1) Enter TWRP recovery. (Click Here To Install    TWRP Recovery)
2) Wipe Dalvik Cache, Cache and System.
3) Choose platinum EDGE ROM zip
4) Wait until is finished
5) Reboot.


Screenshots :


Note : If You Getting Bore From Your Stock ROM And Want A Custom ROM For Your Handset Or Mobile So You Can Post Your Full Mobile Name In Comment Box. I will try to Add Your Mobile Amazing Roms As Fast As Possible.

Don't forget to like our official fb page


Read More

Saturday 28 January 2017

How To Hack Android Pattern By Hax4us

15 comments
Follow These Simple Steps

1. Copy android lock.zip file into an sd card 

2.Switch off the android phone which is locked

3.Put this sd card in that phone

4.Enter into recovery mode by pressing Volume up +Power buttom+Home button in the same time
5.Now select install zip from sd card in recovery mode

6.Select the downloaded file to install

7.After install switch on your mobile normally


8.Now you can see that the lockscreen or password is disabled completely!


Note: Don't panic if your phone ask you for a password, just simply draw a random pattern. 


Don't forget to like our official fb page


Read More

How To Get Unblocked From Someone's WhatsApp Account (Simple Trick) By Hax4us

2 comments
Has someone blocked you onWhatsApp? It's the worst thing that can happen on WhatsApp. But if you want to see that person's activity, how do you unblock yourself ? Logically, until and unless that person unblocks you.


You can unblock yourself from someone's WhatsApp account right from your phone. No need to install any third party application. Use the very old WhatsApp. Here's how you do it.

How To Unblock Yourself on WhatsApp

Important: 1st of all Uninstall your WhatsApp & Recreate account on Very old version of WhatsApp(use existing number). Then follow steps given below↓


Step 1: Delete Your WhatsApp Account

Yes, You've heard right! The first step to unblock yourself from someone else's WhatsApp account is to delete your own account. Go to WhatsApp>settings>Account>Delete Account.

Step 2: Uninstall The Application

Now, you have to uninstall the WhatsApp application completely from your phone and once done, restart your phone.


Step 3: Install WhatsApp From PlayStore

Now you need to go to Google Play store on your Android smartphone and search for WhatsApp. Once you get it, tap install.

Step 4: Recreate WhatsApp Acc.


Once the app is installed on your smartphone, follow the same process of creating an account. Create the WhatsApp account in the existing contact number.

Step 5: That' it

Now check your WhatsApp contacts lists. You have been successfully unblocked. Try yourself! :) 

Don't forget to like our official fb page


Read More

Friday 27 January 2017

How To View Saved Wifi Passwords In Android Trick By Hax4us

2 comments

ES File Explorer:

Step 1. Download and Install ES File Explorer App on your Android device and open the app.
Step 2. Now you need to enable the “Root Explorer” option in ES File Explorer.


ES File Explorer
ES File Explorer

Step 3. Now you need to move to the Root folder in ES File Explorer, and you need to find a directory called “Data.”


ES File Explorer
ES File Explorer

Step 4. Now under the “Data” you need to locate the folder “Misc”


ES File Explorer
ES File Explorer

Step 5. Now under the WiFi folder, you need to locate the file with name wpa_supplicant.conf. Simply open the file with ES File Explorer’s built-in text/HTML viewer.


ES File Explorer
ES File Explorer

Step 6. Now you can see all your SSID (network name) along with PSK (Password) next to it and close the file.


ES File Explorer
ES File Explorer

That’s it! You are done, this is how you can find saved WiFi password using ES file explorer.
Don't forget to like our official fb page


Read More

Wednesday 25 January 2017

PC Antivirus Checker By Hax4us

2 comments

 Create a Virus To Test Your Antivirus

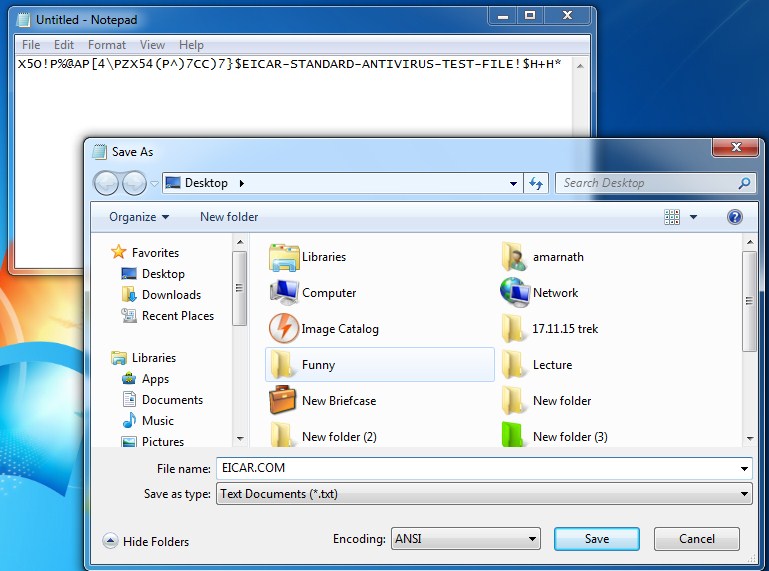
Open notepad and paste the given code and simply save the file as “EICAR.COM”
X5O!P%@AP[4\PZX54(P^)7CC)7}$EICAR-STANDARD-ANTIVIRUS-TEST-FILE!$H+H*
Create a Virus To Test Your Antivirus

If you have an active antivirus, then your antivirus program will simply remove this file in no-time. This is the harmless virus that is used to check the security level of your antivirus.
Don't forget to like our official fb page


Read More

Monday 23 January 2017

How To Hack Facebook By Just Doing Phishing 2017 By Hax4us

43 comments

According To Wikipedia What Is Phishing?

Phishing is an old method of e-mail fraud that is used to gather personal and financial information from the recipients. phishing is the act of attempting to acquire information such as usernames, passwords, and credit card details (and sometimes, indirectly, money) by masquerading as a trustworthy entity in an electronic communication.Phishing is an example of a social engineering technique.  


Step By Step Guide To Hack Facebook Account Using Phishing  

Now lets start our tutorial which is all about how to make facebook phishing page without having the knowledge of any type of coding .

Step:A) first go to this link and download www.Hax4us.Zip file .
(This is mobile version facebook phishing page )

Step:B) Go to on http://www.000webhost.com/ 
and click on sign up. and select any domain name.

Step:CClick on the site link which is shown under DOMAIN section to go to your control panel alternativly You can go to
http://members.000webhost.com/
for fake page uploading.

Step:DNow when you are logged into your account click on the Go to Cpanel in front of your domain that you had registered, and then Go to File Manager under Files and log into it.


Step:E) After logging to Your File manager Section. Now Click on the Public_html directory.

Step:F) Now click on the Upload button, choose the Downloded zip file .(I recommended Chrome or firefox for uploading bcz other browser may be not work properly for this site)

Step:GNow any one who visits your site would be taken to the Fake Facebook Login Page. After they enter their Username and Password, the username and password would be go to "passes.txt" file.

Step:H) To Find Your Phishing Site Link or Url Please Refer To below Image.

Step:INow Everything is set. The Only thing that we have to do is that pass the link to victim.after that if he/she login through that link then we are able to get his/her account and password.For any doubts or Query or any Confusion...plz comments..i will try to give response as soon as possible

Don't forget to like our official fb page


Read More

Saturday 21 January 2017

Enable Multi-User Support Like PC in Android Lollipop

1 comment
Hax4us
Lollipop has come up with multi-user support through which you can have multiple user accounts on any Android device along with a guest user account that has limited access to various features. While this is a really interesting and useful feature, it is not available in many of the Lollipop based smartphones simply because the manufacturer did not want to make this feature available to the customers. If you could not find the multi user support in your Android Lollipop device then you can make a little change in the system files to enable it. Here is how:


What is build.prop?

One area we haven’t talked too much about is the build.prop file and what you can do with it. The “build.prop” file is a system file that contains build properties and settings. Some of the contents are specific to your device or your device’s manufacturer, others vary by version of the operating system, but some are generic to all devices running the same version of Android as you are.
All you need to make any of the changes you’re about to see is a rooted device, a root file explorer, and a root text editor. I’m old-school, so I like Root Explorer (which includes a text editor), although there are various build.prop editors that you can get from the Play Store to help make the process even easier. Use whichever method works for you. If you go the explorer/text editor route, navigate to /system/ and make a backup of build.prop (optional), then open it as read-write (it’s read-only by default).
After that, simply change the values of existing lines, or add new lines. Save the changes and reboot, and make sure you like the changes you made. If not, simply re-edit the build.prop, save, and reboot again.

  1. First of all you should have a rooted device. You can use Kingo Root to root any Android device easily, if your device is not already rooted.
  2. Install ES File Explorer from Google Play Store. This is necessary for making changes to the system files.
  3. In the ES File Explorer, open menu and select Root Explorer. This is required to make changes to the system files.
  4. In the ES File Explorer, open the folder /device/system/ and locate the file build.prop. Touch on the file build.prop and select ES Note Editor to open this file.
  5. In the ES Note Editor app, switch to the Edit mode by selecting Edit from the menu.
  6. Go to the very bottom of the build.prop file and type the following :   
  7. #Multiuser support
    fw.max_users=3
    fw.show_multiuserui=1
  8. Save the build.prop file and restart your Android device. You should see the new Users option in the Android setting screen and should be able to switch to the guest account from the notification bar.
Don't forget to like our official fb page


Read More

Install Linux on your Android device No Deploy No Root No worries Trick By Hax4us

1 comment

Use GNURoot to install a GNU/Linux distribution on your Android device


Before we get going, I should warn you that this isn't like installing a full-blown Linux distribution on Android. What you are effectively doing is installing a system that adds a Linux sub-system, which includes a lot of tools (including apt-get) and the ability to launch a minimal X Server. The developers managed to create a very handy system that isn't all that difficult to use and certainly has its place in an admin toolbox.
Let's get this baby up and running and see what it has to offer.

Installation

Fortunately, you do not need root to install GnuRoot. In this instance, the word "root" comes from the fact that this app actually installs a "fake" Linux root file system. With that in mind, the installation is as simple as any other. I've installed the Debian version of GNURoot. Here's how:
  1. Open the Google Play Store on your Android device.
  2. Search for gnuroot debian.
  3. Locate and tap the instance by Corbin Champion.
  4. Tap Install
  5. Read the permissions listing
  6. If the permissions listing is acceptable, tap Accept
  7. Allow the installation to complete

From the main window (Figure A), you'll see two tabs (INSTALL/UPDATE and LAUNCH).
Figure A

Before you do anything, you must first install the GNURoot Debian patches by tapping Install/Reinstall. This will open a new window (within GNURoot) and begin the process of installing the necessary components (Figure B).
Figure B
Installing the latest patch for GNURoot.
Next, you must tap Patch Installation (from the main window). This will install the necessary patches for you to run the X applications. Once that completes, go back to the main window and tap Install X Support. Upon completion of that, your GNURoot is ready to rock.

Launching a window

From the main screen, tap the LAUNCH tab. Here (Figure C) you'll find three buttons: Launch (will launch a command prompt window), Launch X (will launch a rudimentary X session), Reconnect to X (will reconnect to the X server).
Figure C
The GNURoot Launch tab.
Tap Launch, and you'll see a new bash prompt appear (Figure D). This is where you can install applications from the command line.
Figure D
The GNURoot command prompt ready for action.
Say you want to install the old-school Alpine text-based email client. To do that, type out apt-get install alpine. When prompted, tap y and the installation will commence. When the install finishes, you can then run the alpine command as if you were on a standard Linux machine and enjoy that old-school email feeling (Figure E).
Figure E
The Alpine email client.
In order to run X applications, you must go back to the main window and tap Launch X. Eventually, an xterm will open (Figure F), where you can run X Windows apps (if you've successfully installed one).
Figure F
A GNURoot X session.
If you're looking for a way to run a necessary Linux application on your non-rooted Android device, GNURoot might be the easiest method. Once you have the hang of it, it's quite painless, and it just might help gain you a bit more admin-centric usefulness from that Android device that you otherwise may not have had.
Don't forget to like our official fb page


Read More