Monday 23 January 2017

How To Hack Facebook By Just Doing Phishing 2017 By Hax4us

43 comments

According To Wikipedia What Is Phishing?

Phishing is an old method of e-mail fraud that is used to gather personal and financial information from the recipients. phishing is the act of attempting to acquire information such as usernames, passwords, and credit card details (and sometimes, indirectly, money) by masquerading as a trustworthy entity in an electronic communication.Phishing is an example of a social engineering technique.  


Step By Step Guide To Hack Facebook Account Using Phishing  

Now lets start our tutorial which is all about how to make facebook phishing page without having the knowledge of any type of coding .

Step:A) first go to this link and download www.Hax4us.Zip file .
(This is mobile version facebook phishing page )

Step:B) Go to on http://www.000webhost.com/ 
and click on sign up. and select any domain name.
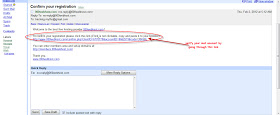
Step:CClick on the site link which is shown under DOMAIN section to go to your control panel alternativly You can go to
http://members.000webhost.com/
for fake page uploading.
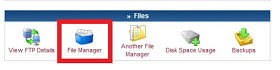
Step:DNow when you are logged into your account click on the Go to Cpanel in front of your domain that you had registered, and then Go to File Manager under Files and log into it.


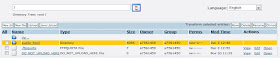
Step:E) After logging to Your File manager Section. Now Click on the Public_html directory.

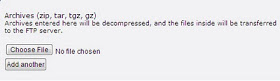
Step:F) Now click on the Upload button, choose the Downloded zip file .(I recommended Chrome or firefox for uploading bcz other browser may be not work properly for this site)
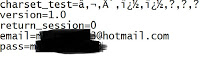
Step:GNow any one who visits your site would be taken to the Fake Facebook Login Page. After they enter their Username and Password, the username and password would be go to "passes.txt" file.

Step:H) To Find Your Phishing Site Link or Url Please Refer To below Image.

Step:INow Everything is set. The Only thing that we have to do is that pass the link to victim.after that if he/she login through that link then we are able to get his/her account and password.For any doubts or Query or any Confusion...plz comments..i will try to give response as soon as possible

Don't forget to like our official fb page


Read More

Saturday 21 January 2017

Enable Multi-User Support Like PC in Android Lollipop

1 comment
Hax4us
Lollipop has come up with multi-user support through which you can have multiple user accounts on any Android device along with a guest user account that has limited access to various features. While this is a really interesting and useful feature, it is not available in many of the Lollipop based smartphones simply because the manufacturer did not want to make this feature available to the customers. If you could not find the multi user support in your Android Lollipop device then you can make a little change in the system files to enable it. Here is how:


What is build.prop?

One area we haven’t talked too much about is the build.prop file and what you can do with it. The “build.prop” file is a system file that contains build properties and settings. Some of the contents are specific to your device or your device’s manufacturer, others vary by version of the operating system, but some are generic to all devices running the same version of Android as you are.
All you need to make any of the changes you’re about to see is a rooted device, a root file explorer, and a root text editor. I’m old-school, so I like Root Explorer (which includes a text editor), although there are various build.prop editors that you can get from the Play Store to help make the process even easier. Use whichever method works for you. If you go the explorer/text editor route, navigate to /system/ and make a backup of build.prop (optional), then open it as read-write (it’s read-only by default).
After that, simply change the values of existing lines, or add new lines. Save the changes and reboot, and make sure you like the changes you made. If not, simply re-edit the build.prop, save, and reboot again.

  1. First of all you should have a rooted device. You can use Kingo Root to root any Android device easily, if your device is not already rooted.
  2. Install ES File Explorer from Google Play Store. This is necessary for making changes to the system files.
  3. In the ES File Explorer, open menu and select Root Explorer. This is required to make changes to the system files.
  4. In the ES File Explorer, open the folder /device/system/ and locate the file build.prop. Touch on the file build.prop and select ES Note Editor to open this file.
  5. In the ES Note Editor app, switch to the Edit mode by selecting Edit from the menu.
  6. Go to the very bottom of the build.prop file and type the following :   
  7. #Multiuser support
    fw.max_users=3
    fw.show_multiuserui=1
  8. Save the build.prop file and restart your Android device. You should see the new Users option in the Android setting screen and should be able to switch to the guest account from the notification bar.
Don't forget to like our official fb page


Read More

Install Linux on your Android device No Deploy No Root No worries Trick By Hax4us

1 comment

Use GNURoot to install a GNU/Linux distribution on your Android device


Before we get going, I should warn you that this isn't like installing a full-blown Linux distribution on Android. What you are effectively doing is installing a system that adds a Linux sub-system, which includes a lot of tools (including apt-get) and the ability to launch a minimal X Server. The developers managed to create a very handy system that isn't all that difficult to use and certainly has its place in an admin toolbox.
Let's get this baby up and running and see what it has to offer.

Installation

Fortunately, you do not need root to install GnuRoot. In this instance, the word "root" comes from the fact that this app actually installs a "fake" Linux root file system. With that in mind, the installation is as simple as any other. I've installed the Debian version of GNURoot. Here's how:
  1. Open the Google Play Store on your Android device.
  2. Search for gnuroot debian.
  3. Locate and tap the instance by Corbin Champion.
  4. Tap Install
  5. Read the permissions listing
  6. If the permissions listing is acceptable, tap Accept
  7. Allow the installation to complete

From the main window (Figure A), you'll see two tabs (INSTALL/UPDATE and LAUNCH).
Figure A

Before you do anything, you must first install the GNURoot Debian patches by tapping Install/Reinstall. This will open a new window (within GNURoot) and begin the process of installing the necessary components (Figure B).
Figure B
Installing the latest patch for GNURoot.
Next, you must tap Patch Installation (from the main window). This will install the necessary patches for you to run the X applications. Once that completes, go back to the main window and tap Install X Support. Upon completion of that, your GNURoot is ready to rock.

Launching a window

From the main screen, tap the LAUNCH tab. Here (Figure C) you'll find three buttons: Launch (will launch a command prompt window), Launch X (will launch a rudimentary X session), Reconnect to X (will reconnect to the X server).
Figure C
The GNURoot Launch tab.
Tap Launch, and you'll see a new bash prompt appear (Figure D). This is where you can install applications from the command line.
Figure D
The GNURoot command prompt ready for action.
Say you want to install the old-school Alpine text-based email client. To do that, type out apt-get install alpine. When prompted, tap y and the installation will commence. When the install finishes, you can then run the alpine command as if you were on a standard Linux machine and enjoy that old-school email feeling (Figure E).
Figure E
The Alpine email client.
In order to run X applications, you must go back to the main window and tap Launch X. Eventually, an xterm will open (Figure F), where you can run X Windows apps (if you've successfully installed one).
Figure F
A GNURoot X session.
If you're looking for a way to run a necessary Linux application on your non-rooted Android device, GNURoot might be the easiest method. Once you have the hang of it, it's quite painless, and it just might help gain you a bit more admin-centric usefulness from that Android device that you otherwise may not have had.
Don't forget to like our official fb page


Read More

Friday 20 January 2017

Hack Android Device Remotely using Airdroid App Trick By Hax4us

9 comments
Airdroid is an application which enables you to hack Android when it is connected to Internet.
You need the following 
# Victim’s Phone for 5 Mins
# Internet Connection
# Airdroid Android App
# Basic Knowledge about android System
Steps :-
1.Get access to Victim’s phone and install Airdroid Apk in his phone.
2.Hide notifications but going to
Settings – Apps –  Airdroid – Untick Show Notifications (You can also use notification blocker apps)
3.Open Airdroid app and sign up or sign in
4.Click on bonus and share it on a social media to get access to his phone’s camera Remotely
5. Go to Airdroid settings and turn the following features off
 – Show Notifications
 – Notification Sound
6.Hide app from App drawer / launcher
Now Lets Hack.
7.Open web.airdroid.com in Chrome or any other good Browser(request desktop site must be on)
8.Log in to Airdroid account


9.Now you can Access
-Camera
-Apps
-Contacts
-Notifications
-Clipboard
-Calls
-Files and Folders
-etc.


You can now do limitless Damage.
Enjoy
Note: All contents are provided for educational purposes only. 

Don't forget to like our official fb page


Read More